Do you want to replace your Toyota’s serpentine belt but do not understand its structure? We’re here to help you. This sharing will inform you of the 2009 Toyota Camry serpentine belt diagram and where you can find the diagram? Keep scrolling.

What Is A Serpentine Belt?
In almost all modern cars, you can find a serpentine belt on the front of the car engine. It wraps or rewinds some parts of the engine equipped with pulleys. The part also helps these pulleys to work efficiently in a certain direction and speed.
How does it work? When the engine runs, its crankshaft pulley rotates, pulling this serpentine belt. Meanwhile, the pulleys of the power steering, tensioner, generator, water pump, or AC, will rotate to run the machines.
Serpentine belt material is neoprene or EPDM (ethylene propylene diene monomer) rubber. The EPDM has properties similar to other natural or synthetic rubbers yet has a longer shelf life.
However, both materials will eventually wear out and develop problems like fractures and tearing. To prevent any failure, replace this belt as soon as you see any evidence of damage or strain.

What Is The 2009 Toyota Camry Serpentine Belt Diagram?
A serpentine belt diagram is a visual depiction of the belt’s circulation for use as a guide in assembly, upkeep, or belt change. Moreover, it might help determine which pulley or part a squeaking or sliding belt could be connected to.
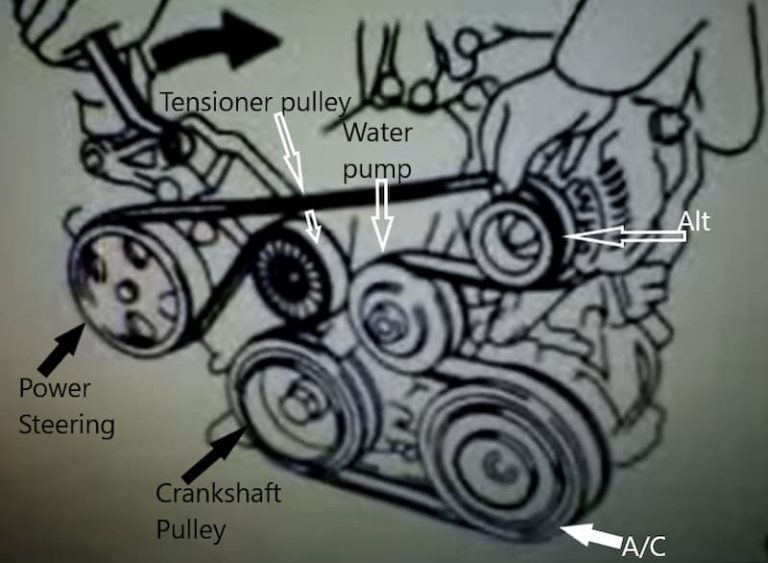
2009 Toyota Camry Serpentine Belt Diagram
Since serpentine belt routing might change based on car models, it’s crucial to refer to the owner’s handbook or service manual for your particular car model.
Below is the anatomy of the 2009 Toyota Camry serpentine belt. Similar to the 2008 Toyota Camry serpentine belt, the belt connects the power steering, tensioner, generator, water pump, crankshaft pulley, and air conditioning. You can see the diagram below for more clarity.
How Long Does A Serpentine Belt Last?
A serpentine belt typically lasts 60,000 to 100,000 miles or five to seven years. You might need to change the belt earlier if it is subjected to extremely high or low temperatures or harsh chemicals.
The useful life of this belt can differ based on many elements, including the model, the manufacture year, the quality, and the road surfaces.
Most manufacturers should regularly inspect serpentine belts, such as those performed as part of standard auto maintenance. It should be replaced if the belt shows signs of wear or corrosion.
Yet, certain belts must be modified because they are physically tensioned. Others feature a self-tensioning system that may require maintenance due to deterioration over time.
One thing to keep in mind is that, in most circumstances, once the serpentine belt cracks, the car will not keep operating.

Where Can I Find The Serpentine Belt Diagram for My Car?
Like the Toyota Camry wheel lock key location, a decal with the serpentine belt schematic is usually spotted in the engine compartment. That said, if your automobile lacks this sticker, you may quickly find the schematic in a service handbook or website.
Another choice is to picture the old belt before removing it. You can consult the car’s handbook to guarantee proper circulation while replacing the new belt.
How To Replace Toyota Camry Serpentine Belt?
Step 1: Lift The Car Up
The first step is to drive your car to garages or secure parking spaces. Next, use the jack tool to lift the car up. Secure the jack brackets for a safe replacement of the belt. The logical position is in front of the frame of the front wheel.
Step 2: Remove Front Tire And Fender Splash Panel
Next, remove the 2 front tires and the bolts holding the wheel fenders. After that, you can pick up the panel and lay it away.
Then you will see a pulley, a swing bar, and a hydraulic cylinder. They are the components of the 2009 Toyota Camry belt tensioner, which applies pressure toward the belt. You should note that the head of bolts attached to the removal tool’s socket is fixed.
Besides, the swing bar will rotate as the engine runs. Remember that this aluminum alloy’s bolt head is prone to stripping.
Step 3: Remove The Serpentine Belt
Use a long wrench to turn the belt tensioner and release the belt. A special service tool produced by Toyota is another option. Next, spin the tool counterclockwise after attaching the socket to the screw.
The tensioner’s structure may incorporate the prior stated tiny hydraulic cylinder. Thus, this motion should be carried out gently. Following that, keep the wrench in its place once the nuts have stopped spinning.
Loosen the serpentine belt from the pulley nearest to you at this point. Take the belt out of the motor area using your screwdriver, and then take it from the other pulleys.
Coming next is to find the instrument panel in the tire bore and the bottom of the nut keeping the hydraulic cylinder tensioner. It will be best not to lift the piston off its socket but loosen the nut.
Step 4: Hold The Engine
This is an important step to help ensure safety during the 2009 Toyota Camry 2.4 serpentine belt replacement process. Stack a substantial wooden plank on top of your lift jack, then put it below the oil pan of the powerplant. Lift the jack till the plank holds the engine but do not raise it.

How To Replace A Serpentine Belt In Your Car? – Image source: Colony One Auto
Step 5: Remove The Bolts
Use a small socket to loosen the bolts securing the motor mount and remove them. Put the engine mount on the side and ensure the engine is still held.
Step 6: Jack Up The Engine
The tensioner shafts on the bolt are necessary to be loosened and removed. Yet, due to its length, it will need more space.
You may apply the trolley jack to raise the car a few inches (1 or 2 inches is best). The oil pan may be harmed by excessive pressure on the engine’s end, leading to further damage. So be careful.
Remove the other bolt with a long wrench. Utilize a shorter one after it is released. Once there is enough space to slide the wrench between the bolt and the edge of the engine bay, remove it till it contacts the engine bay’s surface.
Slip the strut of the end of the tensioner off its connection screw from the instrument panel.
Rotate the tensioner so the exposed bolt tip faces upward after separating the end of the strut. Then you can use your hand to take out this bolt till the studs are separated from the engine compartment.
Pull the tensioner up to the car while the bolt is still in the mount. Next, be patient and carefully raise the tensioner to hold the struts at the end.
Rotate the strut upward and around the bolt and connecting brackets. You can raise the tensioner and remove it from the engine bay while turning and twisting it.
Step 7 – Replace The Belt
Never use an old belt again. Next, you should have a schematic showing the course of the spiral drive belt in the hood.
The water pump pulley should always be the last when routing the belt over groove spindles. The reason is that the belts may slide onto the pulley more easily. Finally, replace the belt with a new one.
FAQs
Can I Replace A Serpentine Belt Myself?
Yes.
Changing a serpentine belt is often a simple process. You can typically handle the work yourself if you possess the necessary equipment and knowledge.
However, before you begin, you should record the serpentine belt’s routing to restore it properly.
Do Serpentine Belts Have Direction Of Rotation?
No, it’s non-directional.
The rotational axis of a new serpentine belt typically has no bearing since almost all of them are symmetrical. However, the new belt’s proper routing over the pulleys is important. It’s also crucial that the belt’s grooved end contact with the pulley grooves.
How about a second-hand serpentine belt? The position in which you replace a used serpentine belt might have an impact based on the top producer of drive belts.
To replace your previous serpentine belt in the same direction, the manufacturer advises painting an indicator. By doing this, you may be assured that the drive belt’s ribs match the pulley grooves.
Can You Install The 2009 Toyota Camry Serpentine Belt Not According To The Diagram?
No.
Serpentine belts with no direction are the standard, though some can be installed incorrectly. But doing so can overheat and wreak havoc on the engine.
The belt’s grooved sections should reach the pulleys’ grooves, and its smooth sections need to touch the pulleys’ surfaces.
Using a belt routing diagram, you can ensure the belts are running straight. When you take off the old belt, you should snap a picture of it. You may then use the image as a guide when putting the new belt on.
Conclusion
What is the 2009 Toyota Camry serpentine belt diagram? It is a visual depiction of the operation of the serpentine belt around the pulleys of the power steering, tensioner, generator, water pump, crankshaft pulley, and air conditioning.
You can replace the belt yourself if you have the tools and experience. We hope you found this article useful. See you in the next posts.