The engine is rather complicated and of paramount importance because it controls most of the car’s operations, including the pulley’s belt. The other components can work properly when these pulleys are stable, thanks to the serpentine belts.
However, it is quite difficult to identify these pulley and belt components directly in the engine. Thus, we may need a belt diagram. What is the 2011 Toyota Camry 2.5L belt diagram? Your serpentine belt is stretched, and you want to change it? How to do it correctly? Let’s read on.

What Is The 2011 Toyota Camry 2.5L Belt Diagram?
The 2011 Toyota Camry 2.5L belt diagram is a visual instruction on the engine’s configuration of the pulleys and belts. They work together to operate specific parts.
What Does The 2011 Toyota Camry 2.5L Belt Do?
The 2011 Toyota Camry 2.5L belt is a part of the car engine. It is designed to wrap around pulleys that drive components such as crankshaft, tensioner, generator, water pump, cooler compressor, etc.
It helps these pulleys operate more smoothly and efficiently. When the engine starts running, this belt pulls the pulleys in a certain direction for the parts to work correctly.
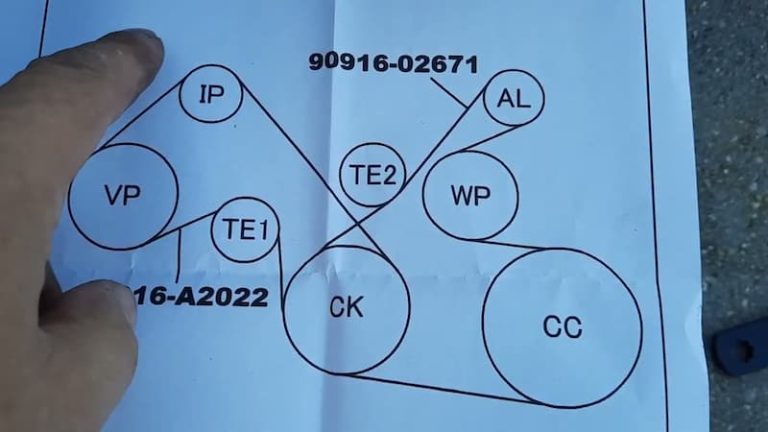
The 2011 Toyota Camry 2.5L Belt Diagram
The 2011 Toyota Camry 2.5L belt diagram visually represents parts wrapped by the belt. This diagram assists drivers in identifying problems with belt stretching and replacement or damage to the pulleys. It is also a great reference when assembling the pulleys and the belt.
This part is made of rubber, neoprene, or urethane that has been strengthened. The material plays a significant impact on how long it will last.
While more recent belts consisting of Ethylene Propylene Diene Monomer (EPDM) rubber can last around 100,000 miles, the modern Neoprene rubber belt typically lasts approximately 50,000 miles.
You can take a look at the below 2011 Toyota Camry 2.5L belt anatomy in which:
IP: Idler Pulley
VP: Vane Pump
TE: Tensioner
AL: Alternator
WP: Water Pump
CK: Crankshaft
CC: Cooler Compressor

The anatomy of the belt on 2011 Toyota Camry 2.5L – Source: eBay
How To Replace The 2011 Toyota Camry 2.5L Belt?
Step 1: Disconnect The Battery
You should unplug the battery before beginning any automobile repair for the utmost safety. To remove the nut securing the ground wire over the battery’s negative terminal, use a proper-size wrench or tool.
Toss the cable to the battery side after removing it from the terminal. It won’t be necessary to unplug the positive terminal.
Step 2: Lift The Car And Remove The Front Tire
The next step is to drive your car to a spacious and safe place, then use the jack to raise the vehicle. Once the brackets are in place, remove all bolts from the front wheel and then take out the wheel. Next, you will see the pulleys wrapped around by the tensioner belt.
Step 3: Release The Tensioner
To release the automatic tensioner, you need a wrench. Though you can’t see it on the 2011 Toyota Camry belt diagram, this tensioner includes a bolt that can be tightened with a socket or a notch. Put the wrench or a screwdriver over the tensioner’s screw and turn it off the belt to remove the tension.
You can turn the tension clockwise to proceed the step. To resist tearing the tensioner’s bolt, you need a proper size wrench.
Step 4: Loosen The AL’s Bolts
In the AL mount (alternator) mount, remove the two screws that connect the eyelets around the mount if your car has it to provide belt tension. The alternator may slide around the engine and release pressure when you unscrew the bolts due to the stress applied to the belt.
Next, lift the generator by loosening the bolts and do not totally unscrew them.
Step 5: Take The Belt From The Pulleys
Once the tension is released, detach the belt from the other pulleys of the motor and remove it from the one that’s been putting pressure on it. Ensure to carefully take off all the pieces that may have broken off the belt if it is badly broken or damaged.
Step 6: Check The New Belt
Compare the old and new belts and ensure they have the same length and amount of ribs running across them horizontally. Because of being stretched, the old one can be longer and thinner than the new one.
Once the new belt has a different length from the old one, you can not apply it. Furthermore, if there are any broken indications from the manufacturer, the new belt might tear when you attach it. So check it carefully.
Just like the old belt, slide the new one around the pulleys. You can use the belt image you took before detaching it or the above diagram we provided. Besides, you can refer to the owner’s handbook of your car as a guideline.
Apart from the tensioner, the belt needs to have enough length to cycle around every pulley. In case it is still slack after routing, you might choose the wrong size belt, or the routing was done improperly.
Step 7: Replace The Belt
Slip the belt through the car tensioner and exert pressure. Thread the belt around the pulley after loosening it with a screwdriver or a wrench. When the belt is in position, let go of the tensioner’s grip so that the belt will stay in place.
It will be best to ask for someone’s help since it could be challenging to exert pressure on the tensioner and change the belt.
Next, you need to raise the belt’s tension. Put a claw hammer or a wood bar between the generator and the motor.
Raise the pressure on the belt by passing it through the alternator pulley before prying the alternator away from the engine with the help of the bar.
Then, you need to apply the tension again and twist it to tighten the bolts.
When you apply pressure on the generator, you might need someone to help you tighten the nuts. It will be best not to push against any plastic components in your engine compartment to prevent damaging anything.
Why And When Do We Need To Replace The Belt?
The engine accessories shown on your 2011 Toyota Camry V6 serpentine belt diagram are powered by the drive belt using the engine rpm.
This belt runs under tension and is mounted on pulleys. This secures the belt in position and supplies the attachments with the energy they need to function correctly. The accessories’ performance might suffer or cease entirely whenever the belt begins to wear, is broken, or cracked.
You should change the 2011 Toyota Camry belt when necessary or apply the scheduled service period that is specified in the user manual. Drive belts may get ruined or need to be replaced earlier than anticipated. Thus, it’s advised to inspect them at every periodic check-up.
When you change the drive belt, you may occasionally hear a noise indication. It’s your drive belt signal of maintenance if you detect a screeching sound during or shortly after the car starts.
FAQs
Where Is The Serpentine Belt Diagram On 2011 Toyota Camry 2.5L?
The car itself has a description of the drive belt diagram. Like the 2009 Toyota Camry serpentine belt diagram, you can find this on the frame near the radiators or the hood’s top. There is a decal, a label, or a sticker in the engine bay.
If the decal isn’t present in those places for any reason, turn to your users’ handbook or run a quick search on Google. You can also contact your Toyota dealer for support services.
How Much Does The 2011 Toyota Camry 2.5 Serpentine Belt Replacement Cost?
The price to have a Toyota Camry drive belt changed ranges from $100 to $400. Such a fluctuation is due to the various forms of the drive belt and the number of engine parts the mechanic has to loosen to have access and change them.
What Are The Drive Belt System’s Primary Components?
The main parts are the grooved belt itself, a belt tensioner, pulleys, and bending rollers. In addition, wheels at the shafts and the related parts make up a grooved belt drive.

Toyota Camry 2.5L belt diagram location – Image source: Cars
Conclusion
What is the 2011 Toyota Camry 2.5L belt diagram? It is a depiction of parts’ pulleys wrapped by a belt around the pulleys of components such as crankshaft, tensioner, alternator, water pump, cooler compressor, and vane pump.
You can rely on this diagram to replace belts and easily check if parts or pulleys have problems.
You can change the belt yourself if you have enough tools and experience. We hope you found this article useful. See you in the next posts.