Are you seeking for expert tips on what to do after replacing purge valve?
Your vehicle has so many moving parts that need to be taken care of after a certain work is done to it. One of these is your purge valve, which performs an important function in ensuring your car’s overall lifespan.
Today, we will discuss everything you need to know about the purge valve – its function, some issues involved with it, and important things to do once you have replaced it. Here we go.

Quick Facts About The Purge Valve
Modern cars are equipped with various systems to minimize harmful emissions and promote environmental sustainability. A very critical part of your car is your purge valve. This is among the integral components of your evaporative emission control system or EVAP.
But before we go ahead and talk about what to do after replacing purge valve, let’s first delve into the purpose of a purge valve in cars, exploring this part’s critical role when it comes to ensuring fuel vapor flow and minimizing toxic emissions into the atmosphere.
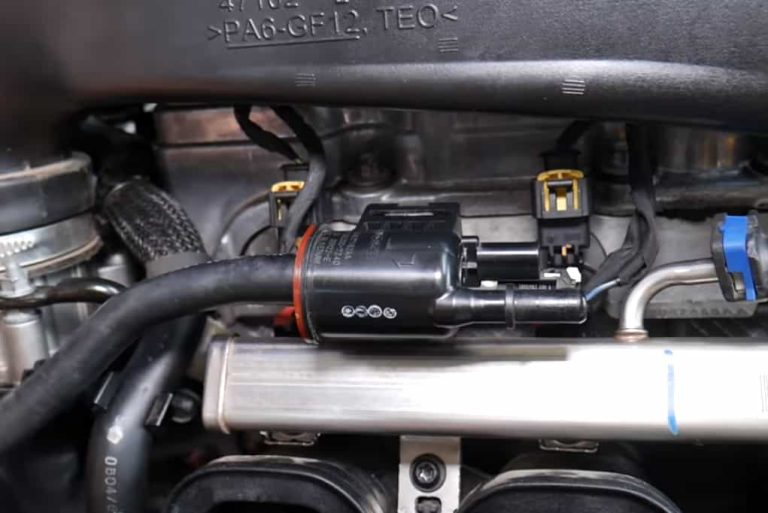
A purge valve, also known as your vehicle’s evaporative emissions (EVAP) purge solenoid, is located in your EVAP emission control system and is a valve that is electronically controlled. It is also found right in the middle of your engine intake manifold and your charcoal canister.
There are many functions of the purge valve including the following:
1. Fuel vapor control
The main purpose of your purge valve is to maintain fuel vapor flow from your charcoal canister and to your intake manifold. It is worth noting that your charcoal canister is another component of your EVAP system. It is designed to absorb fuel vapors from your fuel tank. Therefore, it prevents the release of harmful chemicals into the atmosphere. What your purge valve does is to serve as a gateway, making sure that store vapors are drawn into your engine to be combusted instead of escaping into the air.
2. Activates upon engine operation
When your engine runs, your purge valve stays closed. This makes sure that fuel vapors stay into your charcoal canister. But as your engine control module detects a few conditions including load, temperature, and engine speed, this signals your purge valve so it can open. Hence, a controlled level of fuel vapor escapes from your intake manifold.
3. Efficiency and combustion
This fuel vapor coming from the intake manifold combines with incoming air. Then, this creates a homogenous type of air and fuel mixture. This is an important process that improves the engine’s combustion efficiency, which improves your fuel economy while minimizing emissions. As fuel vapors are utilized instead of being wasted, your purge valve helps with keeping your car’s fuel system more efficient.
4. Vapor leak prevention
Aside from regulating the flow of fuel vapor, your purge valve is also critical in prevention of vapor leaks. As your engine stays off, your purge valve remains closed to prevent fuel vapors from entering the atmosphere or getting out of the canister. Because of this, the EVAP emission control system does its job in reducing toxic pollutants into the air.
5. Diagnostics and monitoring
There are several onboard diagnostic systems in your car that check how the various components are performing. If your purge valve is faulty, this triggers an error code and causes the check engine light to switch on. Therefore, you are alerted of a problem, which means it is time to have the purge valve checked to prevent serious trouble to your emission control system.
Now that you know more about the purge valve’s crucial functions and purposes, let us discuss what to do after replacing purge valve.
What To Do After Replacing Purge Valve
As we have mentioned above, your purge valve has a critical function in ensuring the excellent performance of your EVAP emission control system. But once this component fails due to clogs, it results in certain problems including reduced fuel efficiency, rough idling, as well as more emissions.
Once you have replaced your purge valve, be sure to apply these steps on what to do after replacing this component. By doing so, you can prevent further issues and have peace of mind as you drive on the road.
1. Re-check the installation
Prior to doing anything invasive, it is best to check once more if you have installed your new purge valve correctly. Make sure the parts are attached securely and that the purge valve is connected well to the hoses. Check the alignment, as well , since any misalignment can lead to leak issues. Thus, the replacement is rendered as ineffective.
2. Clear any error codes, if any.
If there is a malfunction to your purge valve, this often triggers your check engine light to switch on. Then, error codes are stored in your vehicle’s on board diagnostic system. This is why we highly recommend checking for any error codes using your OBD-II scanner. You can also disconnect your car battery for about 10 to 20 minutes. By doing so, previous error codes linked with a faulty purge valve can be eliminated. This also makes sure there are no false readings that can lead to future problems.
3. Test for leaks
Now that you have conducted a re-check of the installation and made sure error codes have been cleared, check for leaks in your EVAP emission control system. Do this by starting your engine and keep it idle for about 15 minutes. Afterwards, inspect your purge valve and hoses nearby for leakage signs. You may want to look for a fuel odor or hissing sounds. Then, you can make a visual check for damaged hoses, loose connections and other things that do not seem normal. Have any issue addressed immediately to prevent problems with your emissions.
4. Do a system reset when need be
There are instances when your onboard computer will require a system reset, which helps it to “relearn” the brand new purge valve installed. Check with your user’s manual on how to go about this step or have a professional take care of this step for you to ensure best results.
5. Conduct a test drive
After making sure that everything is in order, do a test drive of your car. Observe your vehicle’s performance, fuel efficiency, acceleration, and idle stability – check if something seems off. The check engine light should also stay off, which means your purge valve is working as it should. If you observe problems, then you may have to go back to the previous steps.
6. Perform regular checks and maintenance
To make sure that your vehicle’s EVAP emission control system is working well, you need to make maintenance and checks a part of your regular routine with your car. Inspect the hoses, purge valve, and other parts for damage signs, symptoms of wear and tear and other issues. Then, address any problem immediately to avoid further issues from happening that may lead to costly repairs and inconveniences.
Read More: How To Clean Idle Air Control Valves Without Removing?
Wrap Up
Your purge valve may need to be replaced once problems start to occur such as the ones we have mentioned above. Then, be sure to do certain steps after performing a replacement such as re-checking the installation, checking for error codes, and potentially doing a system reset when need be. By doing so, you can ensure the new purge valve’s performance and avoid bigger problems in the future.