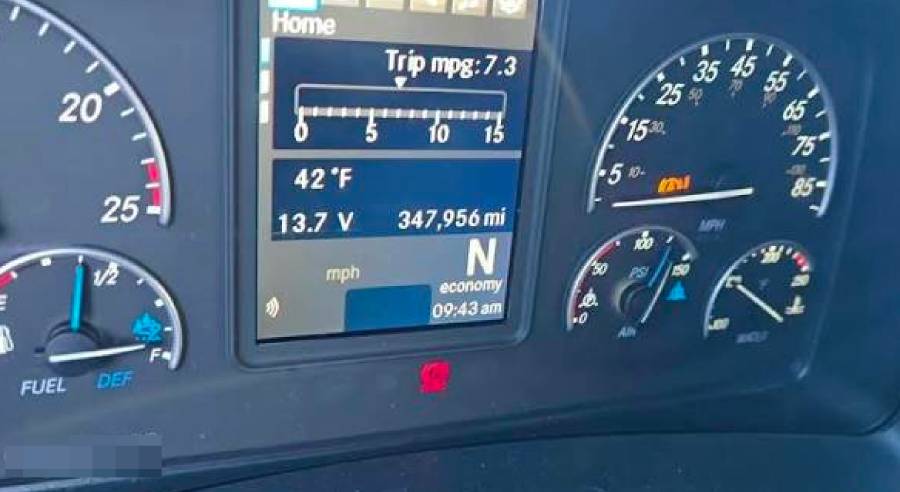
A Freightliner Cascadia alternator not charging is commonly caused by a faulty alternator, defective voltage regulator, loose battery connections, damaged charging cables, poor ground connections, or a slipping serpentine belt. These problems prevent the charging system from supplying sufficient electrical power to the truck’s batteries and electrical components while the engine is running.
The most common signs of a charging system failure include a battery warning light, low battery voltage, dim headlights, intermittent electrical problems, and batteries that gradually lose charge while driving. A properly functioning 12-volt charging system commonly maintains approximately 13.5–14.8 volts under suitable operating conditions, although actual voltage depends on the alternator configuration, electrical load, temperature, and charging controls. A reading outside the expected range requires further diagnosis rather than immediate alternator replacement.
Diagnosing a Freightliner Cascadia charging problem involves checking battery voltage, inspecting the alternator drive belt, testing charging output with a digital multimeter, and examining electrical connections for excessive resistance. These tests help distinguish an internally damaged alternator from wiring faults, battery problems, and other charging system failures.
This guide explains the causes and symptoms of Freightliner Cascadia alternator charging problems, provides step-by-step diagnostic procedures, and covers repair methods to restore reliable charging performance.
Why Is My Freightliner Cascadia Alternator Not Charging?
A Freightliner Cascadia alternator may stop charging because of six main problems: alternator failure, a defective voltage regulator, damaged charging cables, poor ground connections, a faulty belt drive, or a charging circuit fault. Each problem disrupts the generation, regulation, or delivery of electrical power to the truck’s batteries.
The alternator converts mechanical energy from the engine into electrical energy through a belt-driven pulley. Its internal rotor and stator generate alternating current, which the rectifier converts into direct current for the truck’s electrical system. The voltage regulator controls alternator output according to the charging system’s operating requirements. When one of these components fails, the alternator may produce insufficient voltage or stop generating usable electrical power.
However, low battery voltage does not always indicate a defective alternator. Corroded battery terminals, damaged charging cables, and loose ground connections can create excessive electrical resistance, preventing adequate charging current from reaching the batteries. A worn serpentine belt or defective tensioner can also reduce alternator speed and output. Depending on the model year and electrical configuration, faults in the alternator’s excitation or control circuit can produce similar symptoms.
The correct diagnosis requires measuring voltage at both the alternator output terminal and the batteries while the engine runs. Comparing these measurements helps determine whether the alternator is failing to generate power or the charging circuit is preventing power from reaching the batteries.
What Are the Symptoms of a Freightliner Cascadia Alternator Not Charging?
The five main symptoms of a Freightliner Cascadia alternator not charging are battery warning lights, low system voltage, dimming headlights, repeated battery discharge, and intermittent electrical malfunctions. These symptoms occur when the alternator cannot supply enough electrical power to support the truck’s electrical loads and maintain battery charge.
1. Battery warning light or charging system warning. A battery-shaped warning indicator or charging-related dashboard message can appear when the truck detects abnormal electrical system conditions. The warning may remain illuminated while the engine runs or appear intermittently during operation. The exact warning behavior depends on the Freightliner Cascadia model year, instrument cluster, and electrical system configuration.
2. Low battery voltage while the engine is running. A charging system that is not supplying sufficient power allows battery voltage to decline as electrical loads consume stored energy. In a conventional 12-volt charging system, a reading near 12 volts with the engine running and electrical loads active can indicate inadequate charging. However, voltage readings must be evaluated against the truck’s charging controls, battery condition, and operating conditions before confirming a fault.
3. Dimming or fluctuating headlights. Headlights and other electrical equipment may become dim or fluctuate when system voltage falls or becomes unstable. These changes can become more noticeable when additional electrical loads, such as the blower motor or auxiliary equipment, are operating. Dimming lights can also result from poor ground connections or voltage drops in the electrical circuit.
4. Batteries repeatedly losing charge while driving. When the alternator stops providing adequate charging current, the batteries supply power to the truck’s electrical systems. Continued operation reduces the available battery charge and may eventually cause electrical equipment to malfunction or prevent the engine from restarting. Repeated battery discharge can also indicate deteriorated batteries or excessive electrical loads, so alternator testing is necessary.
5. Intermittent electrical malfunctions. Unstable system voltage can cause dashboard warnings, electronic module faults, and inconsistent operation of electrical accessories. Loose alternator connections, damaged wiring, intermittent regulator faults, and belt slippage can produce charging problems that appear and disappear as engine speed, temperature, or electrical demand changes.
These symptoms identify a possible charging system problem but do not establish which component has failed. Measuring charging voltage, inspecting the belt drive, and testing electrical connections are necessary to distinguish alternator failure from battery and wiring problems.
What Causes a Freightliner Cascadia Alternator to Stop Charging?
A Freightliner Cascadia alternator can stop charging because of six primary causes: a faulty voltage regulator, loose or corroded electrical connections, a slipping serpentine belt, internal alternator damage, a defective charging circuit, or poor ground connections. Each fault affects the alternator’s ability to generate, regulate, or deliver electrical power to the batteries.
The cause can be identified by inspecting the alternator drive system, measuring charging voltage, and testing the electrical connections between the alternator and batteries. A failed alternator may produce little or no electrical output, while a wiring or connection problem can prevent normal alternator output from reaching the batteries.
Can a Bad Voltage Regulator Stop the Alternator From Charging?
A defective voltage regulator can prevent a Freightliner Cascadia alternator from charging by failing to control the alternator’s field current correctly. The regulator adjusts the alternator’s electrical output to meet the charging system’s requirements and prevent excessive battery voltage.
When the regulator fails to provide sufficient field current, alternator output can drop below the level required to maintain battery charge. A regulator fault can also cause excessive charging voltage or unstable output. For example, an alternator that produces inadequate voltage despite a properly functioning belt drive and intact electrical connections may have a regulator or internal excitation problem.
The voltage regulator may be integrated into the alternator or controlled through another part of the vehicle’s charging system, depending on the installed alternator and electrical configuration. Confirming regulator failure requires checking the applicable control circuit and alternator output rather than relying on battery voltage alone.
Can Loose or Corroded Connections Cause Alternator Charging Failure?
Loose or corroded electrical connections can prevent a Freightliner Cascadia battery from receiving sufficient charging current even when the alternator generates normal voltage. Corrosion, damaged cable terminals, and loose fasteners increase electrical resistance between the alternator and batteries.
Electrical resistance creates a voltage drop when current flows through the charging circuit. For example, if the alternator output terminal measures 14.2 volts while the battery terminals measure 12.6 volts under the same operating conditions, the difference indicates that the charging path requires further investigation. The actual fault must be confirmed through voltage drop testing because battery condition, electrical loads, and measurement conditions also affect readings.
Common inspection points include the alternator output terminal, battery cable connections, charging junctions, and ground straps. Connections showing corrosion, overheating, damaged insulation, or loose terminals require repair or replacement according to the applicable service procedures.
Can a Slipping Serpentine Belt Stop the Alternator From Charging?
A slipping serpentine belt can reduce or interrupt alternator charging because the alternator depends on engine-driven pulley rotation to generate electrical power. A worn belt, damaged tensioner, seized pulley, or incorrect belt alignment can prevent the alternator from rotating at the required speed.
Belt slippage reduces the mechanical energy transferred from the engine to the alternator. The problem can become more noticeable when electrical demand increases because the alternator requires additional mechanical power to generate higher output. A glazed belt, cracked belt ribs, abnormal belt movement, or squealing noise can indicate a drive system problem.
Inspect the belt for visible damage and verify tensioner operation, pulley condition, and belt routing against the correct engine configuration. A broken belt may also disable other belt-driven components, depending on the engine arrangement. Stop the engine before inspecting or servicing the belt drive.
Internal alternator damage is another cause of charging failure. Failed rectifier diodes, damaged stator windings, rotor faults, and worn internal components can reduce alternator output or prevent electrical generation. These faults require appropriate alternator testing to distinguish internal failure from an external charging circuit problem.
A defective charging circuit can also interrupt charging. Damaged cables, open fusible links, faulty excitation wiring, and control circuit faults can prevent normal alternator operation or disconnect its output from the batteries. Fuse and circuit protection arrangements vary by Freightliner Cascadia model year and electrical configuration, so the correct wiring diagram must be used before testing or replacing components.
Poor ground connections increase resistance in the electrical return path and can interfere with charging performance. Corroded engine ground straps, loose battery ground terminals, and damaged ground cables can create voltage differences between the alternator housing, engine, chassis, and battery negative terminals. A voltage drop test under load helps identify excessive resistance in these connections.
Identifying the exact cause before replacing the alternator prevents unnecessary repairs. A charging system diagnosis should confirm alternator output, belt operation, positive cable integrity, ground continuity under load, and relevant control circuit operation before concluding that the alternator itself has failed.
How Do You Test a Freightliner Cascadia Alternator That Is Not Charging?
To test a Freightliner Cascadia alternator that is not charging, measure battery voltage with the engine off, check charging voltage with the engine running, test the system under electrical load, and measure voltage drop across the charging cables. These four diagnostic steps help determine whether the alternator produces sufficient electrical power and whether that power reaches the batteries.
A digital multimeter is the primary tool for measuring charging voltage and identifying excessive resistance in electrical connections. A DC clamp ammeter and a compatible diagnostic scanner provide additional information when voltage measurements alone cannot identify the fault.
Before testing, park the truck on a level surface, apply the parking brake, secure the vehicle against movement, and inspect the alternator belt and electrical connections with the engine off. Keep hands, tools, clothing, and test leads away from rotating components when the engine is running. Never disconnect a battery cable while the engine runs because the resulting voltage transients can damage electronic components.
How Do You Check Alternator Charging Voltage With a Multimeter?
Check Freightliner Cascadia alternator charging voltage by measuring DC voltage across the battery terminals with the engine off and then repeating the measurement with the engine running. Comparing the readings establishes whether the charging system is increasing battery voltage under the tested conditions.
First, set the digital multimeter to DC voltage and connect the red probe to the battery positive terminal and the black probe to the battery negative terminal. With the engine off and the batteries sufficiently rested, a fully charged conventional 12-volt lead-acid battery typically measures approximately 12.6–12.8 volts. A lower reading can indicate partial discharge, battery deterioration, or another electrical problem. On a truck with multiple batteries, verify the battery arrangement and test individual batteries when necessary.
Next, start the engine and measure voltage at the same terminals. A conventional 12-volt charging system commonly produces approximately 13.5–14.8 volts under suitable operating conditions. However, the expected reading depends on temperature, electrical demand, battery condition, and the installed charging system. If voltage remains near the engine-off reading or continues to decrease while electrical loads are operating, the charging system requires further diagnosis.
Turn on the headlights, cab blower, and other appropriate electrical accessories to increase electrical demand. Observe whether system voltage remains within the expected operating range. A substantial voltage decline under load can indicate inadequate alternator output, belt slippage, excessive electrical resistance, or a charging control problem.
When battery voltage is abnormal, measure voltage between the alternator output terminal and its housing using appropriate access and safety procedures. Comparing alternator output with battery-terminal voltage helps distinguish insufficient electrical generation from a problem in the charging path. Avoid contacting the alternator output terminal with grounded metal tools because it may remain energized even when the engine is off.
How Do You Perform a Voltage Drop Test on Alternator Cables?
Perform a voltage drop test by measuring the voltage difference across the positive charging cable and ground return path while the alternator supplies electrical current. This test identifies resistance that can prevent the batteries from receiving adequate charging voltage.
To test the positive charging circuit, set the multimeter to DC voltage and connect one probe to the alternator output terminal and the other to the battery positive terminal or the appropriate charging junction. Run the engine with suitable electrical loads operating and record the voltage difference. A higher-than-specified reading indicates excessive resistance somewhere between the measurement points.
For the ground circuit, measure between the alternator housing and the battery negative terminal while the charging system is operating under load. Excessive voltage drop indicates resistance in the engine ground straps, battery ground cables, mounting connections, or other parts of the return path.
Voltage drop limits depend on the circuit design, charging current, cable length, and manufacturer specifications. A commonly used preliminary diagnostic reference is approximately 0.2 volts or less across an individual high-current connection path, but this is not a universal Freightliner Cascadia limit. Use the applicable service specifications to determine whether a measured voltage drop is acceptable.
If excessive voltage drop is detected, shut down the engine and isolate the electrical system according to the service procedure before inspecting or repairing the affected connection. Check for corrosion, loose terminals, damaged cables, and overheating. Repeat the voltage drop test after completing the repair.
If charging voltage remains low despite a functioning belt drive and acceptable cable voltage drops, further testing of alternator output current, excitation circuits, voltage regulation, and relevant diagnostic fault codes is necessary. These results help determine whether the alternator requires replacement or whether another electrical component is responsible for the charging failure.
How Do You Tell if the Freightliner Cascadia Alternator or Battery Is Bad?
To determine whether a Freightliner Cascadia alternator or battery is bad, compare battery voltage with the engine off and running, perform a battery load test, and verify alternator output under electrical load. A faulty alternator fails to maintain adequate charging output, while a defective battery may lose its ability to store or deliver electrical energy even when the charging system operates correctly.
A healthy, fully charged conventional 12-volt lead-acid battery typically measures approximately 12.6–12.8 volts after resting. If battery voltage remains low after proper charging, the battery may have reduced capacity, an internal defect, or an abnormal electrical load. However, voltage alone cannot establish battery health because a deteriorated battery can display normal open-circuit voltage while failing to supply sufficient current during engine starting.
A battery load test or conductance test helps identify weak batteries. The test evaluates the battery’s ability to deliver electrical current under specified conditions. Freightliner Cascadia trucks equipped with multiple batteries require attention to individual battery condition because one defective battery can affect the performance of the entire battery bank.
Alternator testing focuses on electrical generation rather than energy storage. If battery voltage rises into the expected charging range after starting the engine and remains appropriate under electrical load, the alternator is supplying charging voltage under those conditions. If voltage stays near the engine-off level or decreases as electrical accessories operate, the charging system may not be producing or delivering sufficient power.
The alternator should not be replaced solely because the batteries repeatedly discharge. A faulty battery, damaged charging cable, excessive voltage drop, or abnormal parasitic electrical draw can produce similar symptoms. Confirming alternator failure requires checking its output, drive belt, electrical connections, and applicable control circuits before replacement.
How Do You Fix a Freightliner Cascadia Alternator Not Charging?
To fix a Freightliner Cascadia alternator that is not charging, repair the component responsible for the charging failure, such as a damaged cable, corroded terminal, faulty ground connection, slipping belt, defective regulator, or failed alternator. The correct repair depends on diagnostic measurements rather than the presence of a battery warning light alone.
Start by inspecting the alternator output cable, battery terminals, and charging circuit connections. Corroded terminals should be cleaned or replaced, while damaged cables and overheated connectors require appropriate replacement. Before servicing electrical connections, shut down the engine and isolate the battery system according to the vehicle’s service procedure. Reassemble connections using the specified hardware and tightening torque to prevent overheating and excessive resistance.
If the alternator belt is worn, cracked, glazed, or slipping, inspect the belt tensioner, pulleys, and belt routing. Replace damaged components and confirm that the belt follows the correct routing for the installed engine. A new belt will not correct charging problems caused by a seized pulley, defective tensioner, or internal alternator failure.
Charging circuit faults require electrical testing before component replacement. Inspect applicable fusible links, protective devices, excitation wiring, and charging control connections using the correct wiring diagram. A blown fuse or fusible link should be replaced only after identifying the underlying cause, because an unresolved short circuit or overload can damage the replacement component.
Poor ground connections should be repaired by removing corrosion, restoring secure electrical contact, and replacing damaged ground straps or cables. After repairs, perform another voltage drop test under electrical load to verify that resistance has returned to an acceptable level.
How Do You Replace a Faulty Freightliner Cascadia Alternator?
Replace a faulty Freightliner Cascadia alternator by disconnecting the battery system, removing the alternator drive belt and electrical connections, installing a compatible replacement unit, and verifying charging performance. Alternator mounting arrangements, electrical connectors, pulley designs, and replacement procedures vary by model year, engine, and installed alternator.
Before beginning replacement, identify the correct alternator using the vehicle identification number, engine configuration, and original alternator specifications. Verify the replacement unit’s voltage rating, output capacity, mounting configuration, pulley type, and electrical connections. An alternator with incompatible specifications can cause charging problems or electrical system damage.
Step 1: Disconnect the battery system. Park the truck securely, shut down the engine, remove the ignition key, and follow the manufacturer’s electrical isolation procedure. Disconnect the appropriate battery connections to prevent accidental short circuits. Confirm that the alternator output terminal is de-energized before handling its electrical connections.
Step 2: Remove the alternator drive belt. Locate the belt tensioner and release belt tension using the correct tool and service procedure. Remove the belt from the alternator pulley while recording its routing. Inspect the belt, tensioner, and pulleys for wear or damage before reinstallation.
Step 3: Disconnect the alternator wiring. Identify and label the alternator output cable and any control or excitation connectors. Remove the electrical connections carefully to avoid damaging terminals, wiring insulation, or connector locks. Inspect the removed connections for corrosion, overheating, and loose terminals.
Step 4: Remove the faulty alternator. Support the alternator while removing its mounting fasteners. Lift the unit from its mounting position without damaging nearby hoses, wiring, or engine components. Compare the removed alternator with the replacement to confirm compatibility.
Step 5: Install the replacement alternator. Position the new alternator on its mounting brackets and install the specified fasteners. Tighten the fasteners according to the applicable service specifications. Reconnect the output cable and electrical connectors, ensuring that terminals are clean, secure, and correctly positioned.
Step 6: Reinstall the belt and reconnect the batteries. Route the belt according to the correct engine diagram and restore tension using the specified procedure. Verify that the belt is seated properly on every pulley. Reconnect the battery system according to the manufacturer’s instructions.
Step 7: Test the charging system. Start the engine and measure battery voltage with a digital multimeter. Check alternator output, observe dashboard warnings, and repeat the test with appropriate electrical loads operating. Confirm that the charging system performs within the specifications for the installed alternator and vehicle configuration.
Alternator replacement is complete only after charging performance has been verified. If voltage remains abnormal after installing a compatible alternator, inspect the charging cables, ground connections, battery condition, and control circuits before replacing additional components.
How Do You Know if the Freightliner Cascadia Alternator Is Charging Again?
To confirm that a Freightliner Cascadia alternator is charging again, measure battery voltage with the engine running, verify charging performance under electrical load, and check that charging-related warning indicators no longer report an active problem. These tests establish whether the repaired charging system can supply electrical power and maintain battery charge during normal operation.
Start by measuring battery voltage with the engine off to establish a baseline. Next, start the engine and measure voltage at the battery terminals using a digital multimeter. A conventional 12-volt charging system commonly operates around 13.5–14.8 volts under suitable conditions, although the correct range depends on the installed alternator, temperature, electrical demand, and charging controls. Voltage that remains near the engine-off reading while the batteries are discharging indicates that further diagnosis is necessary.
Next, test the charging system under electrical load by operating the headlights, cab blower, and other appropriate accessories. Observe the voltage response and compare it with the expected operating specifications. The alternator should provide sufficient electrical output to support the connected loads within its rated capacity. A significant voltage decline can indicate insufficient alternator output, excessive circuit resistance, or another unresolved charging problem.
Inspect the instrument cluster for battery warning lights and charging-related messages. If the truck previously recorded electrical fault codes, use a compatible diagnostic scanner to determine whether the faults remain active. A warning light that turns off does not independently confirm successful repair because some electrical problems occur intermittently.
Finally, inspect the alternator belt for correct alignment and abnormal movement, check repaired connections for secure installation, and verify that the batteries maintain an appropriate state of charge. If charging voltage remains unstable or fault codes return, further testing of alternator output current, electrical connections, and charging control circuits is required.
What Voltage Should a Freightliner Cascadia Alternator Produce?
A Freightliner Cascadia equipped with a conventional 12-volt charging system commonly produces approximately 13.5–14.8 volts at the battery terminals under suitable charging conditions. This range is a general diagnostic reference rather than a universal specification for every Cascadia model year, engine configuration, or alternator.
Alternator charging voltage must be higher than battery voltage under ordinary charging conditions to allow current to flow into the batteries. A fully charged conventional 12-volt lead-acid battery typically measures approximately 12.6–12.8 volts after resting, while an operating charging system generally maintains a higher voltage to support electrical loads and replenish battery charge.
The following table summarizes common reference values for a conventional 12-volt lead-acid electrical system.
| Operating Condition | Typical Voltage | Interpretation |
|---|---|---|
| Engine off, fully charged rested battery | 12.6–12.8 V | Normal open-circuit voltage |
| Engine running, charging active | 13.5–14.8 V | Common charging range |
| Engine running, voltage near 12 V and declining | Approximately 12 V or lower | Possible insufficient charging |
| Engine running, sustained excessive voltage | Above the applicable regulated limit | Possible overcharging or regulation fault |
These values are preliminary diagnostic references. Actual readings depend on battery chemistry, battery temperature, alternator specifications, charging controls, and electrical load.
Temperature affects charging voltage because lead-acid batteries require different charging conditions at different temperatures. Temperature-compensated regulators generally increase charging voltage in colder conditions and reduce it in warmer conditions to support battery charging while limiting overcharging.
Electrical demand also affects measured voltage. Headlights, climate control blowers, auxiliary equipment, and battery recharging increase the electrical load on the alternator. At low engine speed, alternator output capacity may be insufficient to support every connected load simultaneously, particularly when batteries are heavily discharged.
An abnormal voltage reading does not automatically prove that the alternator is defective. Excessive resistance in charging cables, poor ground connections, damaged batteries, and control circuit faults can produce readings that resemble alternator failure. Measuring voltage at both the alternator output terminal and battery terminals helps identify differences caused by the charging circuit.
For an accurate diagnosis, compare measured voltage with the specifications for the installed alternator and the truck’s electrical configuration. When voltage measurements are inconclusive, charging current testing and diagnostic fault-code analysis provide additional evidence of charging system performance.
Why Does a Freightliner Cascadia Alternator Charge Intermittently?
A Freightliner Cascadia alternator may charge intermittently because of five main problems: loose electrical connections, damaged wiring, a failing voltage regulator, serpentine belt slippage, or temperature-sensitive alternator components. These faults interrupt charging output under specific operating conditions, making the problem difficult to identify during a single voltage test.
Loose alternator terminals and corroded battery connections can cause charging voltage to fluctuate as engine vibration changes electrical contact. Damaged wiring can produce similar symptoms when movement, heat, or moisture affects the circuit. For example, a partially broken charging cable may maintain electrical continuity while the truck is stationary but develop excessive resistance during engine vibration.
A failing voltage regulator can also cause intermittent charging by inconsistently controlling alternator field current. Internal alternator components, including rectifier diodes and electrical connections, may develop faults that become more noticeable as operating temperature increases. These problems can cause charging voltage to drop after the engine warms up and return to normal after the components cool.
Serpentine belt slippage creates another source of inconsistent alternator output. A worn belt, weak tensioner, or damaged pulley can reduce alternator speed, particularly when electrical demand increases. Inspecting the belt drive helps distinguish mechanical charging problems from electrical faults.
Diagnosing intermittent charging requires monitoring voltage under the conditions that trigger the failure. Record battery and alternator output voltage during engine warm-up, changes in electrical load, and different engine speeds. A compatible diagnostic scanner can also identify relevant charging-system faults. Repeated voltage measurements and targeted circuit testing are more reliable than replacing the alternator based on a single normal or abnormal reading.
Read more: Freightliner Cascadia Battery Keeps Dying? Causes & Fixes
How Much Does It Cost to Replace a Freightliner Cascadia Alternator?
The cost to replace a Freightliner Cascadia alternator depends on four primary factors: the replacement alternator, labor charges, engine configuration, and additional charging-system repairs. The total expense varies according to the alternator’s electrical specifications, parts availability, workshop labor rates, and the condition of surrounding components.
The alternator itself is a major cost component. New original-equipment units, aftermarket replacements, and remanufactured alternators have different prices and warranty terms. Alternators also vary in amperage rating, mounting configuration, pulley design, and electrical connections. Selecting the correct replacement requires checking the vehicle identification number and installed alternator specifications rather than relying only on the Freightliner Cascadia model name.
Labor costs depend on alternator accessibility, belt routing, mounting hardware, and the amount of disassembly required. A workshop may also charge for battery testing, charging-system diagnostics, and post-installation verification. Labor rates differ between independent diesel repair shops, mobile mechanics, and authorized service facilities.
Additional repairs increase the final cost when the charging failure involves damaged cables, corroded terminals, defective ground straps, or a worn belt tensioner. These components should be inspected before replacement because installing a new alternator will not correct an unresolved wiring or mechanical problem.
A reliable replacement estimate should separate the alternator price, diagnostic charges, labor, and any additional parts. Exact pricing requires a current quote for the truck’s configuration and repair location. Comparing itemized estimates helps determine whether repairing an external charging-system fault is more economical than replacing the alternator.
How Can You Prevent Freightliner Cascadia Alternator Charging Problems?
Prevent Freightliner Cascadia alternator charging problems by regularly inspecting the serpentine belt, maintaining clean electrical connections, checking battery condition, monitoring charging voltage, and examining ground cables. These five maintenance practices address common mechanical and electrical conditions that contribute to charging-system failure.
Inspect the alternator drive belt during routine engine maintenance. Look for cracks, glazing, frayed edges, abnormal wear, and signs of pulley misalignment. Check the tensioner and pulley bearings for damage or irregular movement. A properly maintained belt drive transfers engine power to the alternator without excessive slippage.
Keep battery terminals and alternator connections clean, secure, and protected from corrosion. Loose terminals increase electrical resistance and can generate heat during high-current operation. Inspect charging cables for damaged insulation, exposed conductors, overheating, and deterioration near mounting points. Repair damaged wiring before it causes voltage loss or charging interruptions.
Battery maintenance is equally important because weak or deteriorated batteries can place additional demands on the charging system. Check battery condition using appropriate load or conductance testing, particularly when the truck experiences slow starting or repeated discharge. On trucks with multiple batteries, evaluate individual battery condition to identify units that may affect the battery bank.
Monitor charging voltage when performing electrical maintenance or investigating dashboard warnings. Compare measurements under similar operating conditions and investigate unexplained changes. Periodic voltage drop testing can identify deteriorating cable connections before resistance becomes severe enough to interfere with charging performance.
Finally, inspect engine and chassis ground straps for corrosion, looseness, and physical damage. Ground connections provide the electrical return path required for reliable charging-system operation. Maintaining these connections, following the applicable Freightliner maintenance schedule, and addressing early warning signs reduces the likelihood of unexpected alternator charging failures and roadside electrical breakdowns.